Are you wanting to grow potatoes at home? Do you want a huge, delicious harvest, but aren’t sure how to plant potatoes in a way that will achieve amazing results? No worries. I’ve got you covered! By following these 11 tips, you’ll be sure to have the best harvest possible! So here are the 11 things you should know before planting your potatoes at home…

#1: Do NOT use Store-Bought Potatoes
I know it’s tempting to grab that bag of potatoes out of your cupboard and get planting. However, some of these potatoes have been chemically treated to keep them from sprouting (keeping them good to eat for longer). So to be sure that your potato is going to grow well (and to ensure that it’s disease-free), then make sure you purchase seed potatoes or potato slips to grow your potatoes. Or, as another option, you can also purchase potatoes from your local farmer’s market. These will be chemical-free!

#2: You Don’t Need to Sprout your Potatoes
Sprouting your potatoes before planting isn’t necessary. If you plant your potatoes before they sprout, then they might take a few extra days before emerging from the soil. So, letting them sprout first or not, you’ll get a great potato harvest either way.

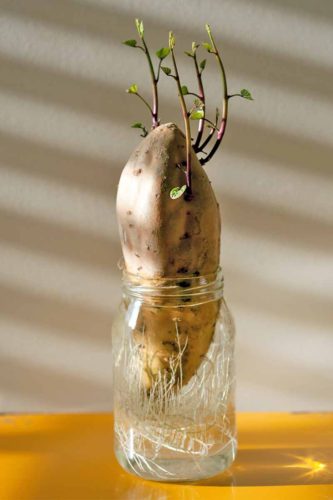
#3: You Can Start your Potatoes in Water
If you still choose to sprout your potatoes before planting (no judging here!), then you can place it straight into a sunny window to sprout. However, if you want to start sprouting and rooting your potato, then put it in water! Simply use toothpicks to hold it up in a cup, then fill it with enough water to cover half of the potato. Wait about a week and you should see signs of your potato growing! (Only be sure that if you cut your potato, give it several days to seal the cut before placing it in water.)
#4: Don’t Plant the Entire Potato
If you’re growing large potatoes, then you don’t need to plant the entire potato. Instead, use a sharp, clean knife to cut it into sections that have 2-3 eyes each. (The eyes are the little knots in the potato.) After cutting it, leave the pieces out to dry for 48 hours before planting. This will give you many more plants, so keep this in mind when you are purchasing your seed potatoes!

#5: You NEED Loose Soil
If you have hard, clay soil, then you will need to amend it, or bring in new soil to plant your potatoes. This is because potatoes are specialized roots that grow to store the plant’s nutrients. If your roots have a hard time pushing against hard, compact soil, then your potatoes will also have a hard time growing. This means that in hard soil, your overall harvest will be smaller. This is why it’s essential that you have loose soil.
For tips on how to loosen up any hard soil, watch the video below!

#6: Plant Eyes Up
When placing your potato cuttings in the soil, place them so the eyes (or sprouts) are facing up. This gives your stems a straight shot up and out of the soil. If you place them down, this will make it harder for your potato’s shoots to emerge.

#7: Mound the Plants
When your plant sprouts and grows around 6 inches (15 cm) tall, add more soil around the base of it to cover all but the top leaves. Then once it has grown to be about 6 inches (15 cm) above the soil once more, push up the soil around it again. This is called ‘mounding’. Mounding your potato plants will increase the amount of roots your plant grows, which in turn, will increase the amount of potatoes that your plant produces.

#8: Fertilize with a High P & K Fertilizer
P & K stand for Phosphorous and Potassium (or Potash on your fertilizer label). Make sure that your fertilizer has a good ratio of P and K, but has a lower N value. This will be something like 5-20-12, with a lower 1st number and a higher 2nd and 3rd number. Phosphorous encourages more root growth, while Potassium is good for the overall health of the plant. Do not fertilizer with a high Nitrogen fertilizer, or you might end up with a big, lush potato plants that have very few actual potatoes.

#9: Harvest at the Right Time
The time to harvest your potatoes is around 2-3 weeks after it starts flowering. At this time the plant will also start falling over and looking wilted. Once this starts to happen, you know that your potatoes are ready to harvest!

#10: Soft-skinned Potatoes Don’t Store
If your potato’s skin is soft and can be brushed off with your finger, then you know that the potato hasn’t fully matured. Most likely you will have a harvest where some of them have matured, but some of them haven’t. Make sure that the soft-skinned potatoes don’t go into storage. They will need to be cooked and eaten within the next several days.

#11: Let Dry Before Storing
For all of your hard-skinned potatoes, you will need to let them air-dry in a cool, shaded location for several days. If stored too quickly, your potatoes might rot. Air-drying gets rid of any excess moisture that might still be in the plant.

Those are the 11 things you should know before planting potatoes at home! I wish you the best of luck and a happy harvest! And make sure you share this post with your other gardening friends.
Not sure where to plant your potatoes? Find out your potato plant’s light requirements in my post How Much Sun do my Plants Need?!
Happy Digging!