Is it time for you to repot your boston fern? I get it. This can be a daunting job…. Especially if this is your first time repotting a fern. But no worries! Just follow these 5 easy steps and you’ll be a fern-potting pro in no time!
Just FYI…. these repotting steps will work for many different types of ferns, including sword fern, Kangaroo palm fern, rabbit foot fern, Maidenhair fern, etc. This particular post will focus on Nephrolepis exaltata, or the boston fern. But these methods can also be used for all other similar fern types!

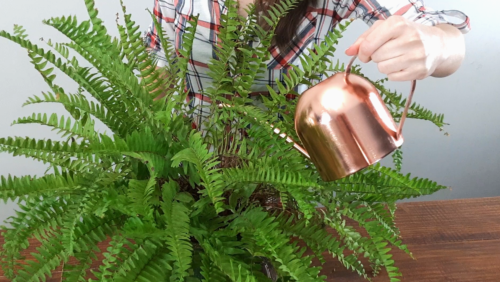
Step 1: Soak the Root Ball
To repot your fern, you’ll first want to soak the root ball. You are trying to get the soil lightly moist. This will make the soil and the roots a lot easier to work with during the repotting process. To do this, I recommend you water it thoroughly (until the water has penetrated the soil and is running out the bottom). Then let it sit for about 15 minutes to let any excess water run off. Now you’re ready to got your hands dirty!
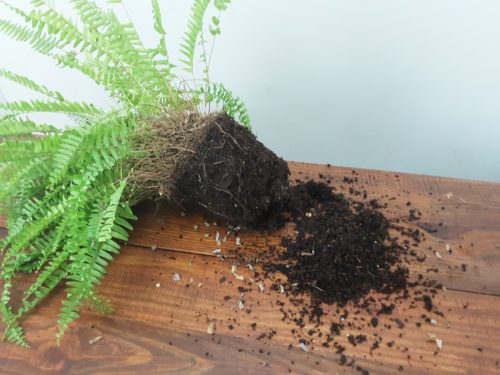
Step 2: Remove from the Pot and Loosen the Roots
Now that your soil is moist, it should come out of your pot fairly easy. Any difficult plants can be soaked for longer, or turned upside down to let gravity help you out. It is NOT a good idea to pull on the fronds, as this can damage your plant. If all else fails, just soak it for longer!
Once it’s out of the pot, you will need to loosen up the soil and “massage” the roots. This can be done by running your hands up and down the sides of the root ball, loosening the soil and the roots that are on the outside. You’ll also need to rub your hands along the bottom of the root ball to loosen any circling roots at the base. Any large circling roots will need to be either de-tangled or clipped.
If your roots are especially root bound, you dono’t need to spend hours massaging your soil. Instead, take a sharp knife (or I sometimes use my pruning shears!) and “score” the sides of your rootball.
If you don’t know what scoring is, it’s just a fancy word for running your knife up and down the sides of your root ball. This cuts up any roots that might be circling the pot and its the lazy-man’s way to quickly repot a fern, while still getting great results!
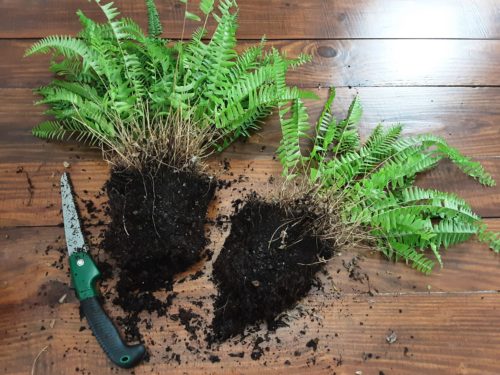
Step 3: Divide if Necessary
If your fern looks like it has more roots than soil then you should divide your plant into two smaller plants.
To divide your plant, you can either massage the soil loose enough that you can pull sections apart, or you can simply cut it. Then to cut it, youll need a large sharp knife or a small, serrated saw. Use caution at all times and please wear gloves! To divide your fern, simply cut the root ball into the pieces you want. Just be careful that you dont damage the fronds in the process. Then place each new plant into a different pot. The new ferns might look slightly bare on one side, but don’t worry… in time there will be new growth that fills in the rough side.
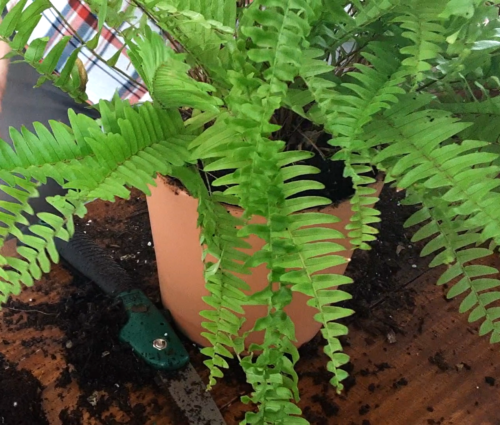
Step 4: Repot in a Slightly Larger Pot
When you repot your plant, (or possibly both boston fern plants), the new pot should only be a few inches deeper and wider than your current pot (or if dividing, your pot should be a few inches deeper and wider than your current rootball.)
If you place it in a pot that is too big, you could run into problems with root rot. Also, make sure that your pot always has drainage holes at the bottom. If you prefer the decorator pots, you can place your fern in a standard nursery pot that has good drainage, and then place this pot inside your decorator pot. I actually prefer this method because it reduces any water damage to my tabletops and windowsills.
Then simply place your fern into its new home and firmly press some fresh potting mix around it.
Step 5: Give Special Care for a few Days
When you’re done repotting your fern, you will need to water it again. You should do a thorough watering by placing it in a sink, tub, or outdoors, then add water until there is water dripping out the bottom of the pot. Then, once it has stopped dripping, place it in a location where it will stay out of direct sunlight for the next few days. This gives your plant a few days to recover and to seal over any damaged roots.
Boston Fern Care
Boston ferns grow best with indirect sunlight and a humid climate. They also prefer an east or west facing window, where they can get a good amount of light but where they will also stay out of the hot afternoon sunlight. You need to be aware that the more light your fern receives, the more it will grow, but the more humidity and moisture the little guy will also need.
Humidity
The best way to provide the high humidity that your fern needs is to use a room humidifier. These work great if you live in a dry climate or you have multiple humid loving plants. However, they can also be a bit expensive and will add humidity to your entire room.
Another way to increase humidity levels is to place your boston fern on the pebble tray, a.k.a. on a tray filled with pebbles and water. The relative humidity will increase as the water evaporates. This can also be simulated through regular misting of your fern.
The final way to increase humidity levels for ferns is to place it in a group of other houseplants. While not as effective as the pebble method or adding a humidifier, grouping house plants together will add a small amount of extra moisture in the air.
Fertilizer
You can use any liquid fertilizer that is recommended for houseplants, as long as you follow the instructions and apply the fertilizer at the recommended rates. Only use fertilizer in the spring and summer months, or during the plant’s growing season. I don’t recommend fertilizing your fern in the winter months, as this can cause a chemical burn to the root system. Instead, wait for early spring when you start seeing new fronds emerging from the root ball.
Yellow Leaves
Yellowing leaves is a common problem among indoor ferns and it can be caused by several things. I would suggest you first check your watering habits. Is the plant often dry? If so, then you might be having issues with too little water, too little humidity, and possibly even spider mites (they thrive in dry conditions!). If your fern is not dry, but is kept consistently moist, then I would recommend checking the plant’s roots for any fungal diseases or root rot. These are the most common reasons why fern leaves turn yellow.

Frequently Asked Questions:
Q1 What kind of soil do boston ferns like?
Boston ferns need moist soil that also drains well. I would recommend avoiding soil mixes for cacti and succulents and instead go with a regular indoor plant mix. You can also mix your own soil with perlite and either peat moss or coconut coir. Mix 2 parts potting soil to 1 part perlite and 1 part peat or coconut coir. Then if your plant is drying out too quickly, increase the amount of peat/ coconut coir.
Q2. Do Boston ferns need deep pots?
Boston ferns do not need unusually deep pots. Their depth should approximately match the fern’s height. If your pot is too deep, it could potentially cause a build-up of excess water at the bottom of the pot. This could cause root rot.
Q3. How do you know when to repot a fern?
Ferns usually need to be repotted every year or two depending on its rate of growth. Your first sign it needs to be repotted is if it is drying out quickly. You shouldn’t need to water it more than once a day. Also, if you can see lots of roots protruding from the top of the soil, then it is definitely time to get him into a new pot and maybe even consider dividing it.
Q4. What kind of pots do ferns like?
The first type of pot that ferns love is self-watering pots. These give them lots of consistent water, (ferns are heavy drinkers). These are the best for small ferns. However, for a fern that needs a larger container, plastic or ceramic glazed pots are best for indoor ferns. If growing outdoors, clay pots are usually your best bet. Then, if you plan on placing your fern in a hanging basket, I would recommend you use a ceramic pot. This is because plastic pots will heat up more than ceramic or clay pots, and this may cause stress on your plant. You will also need to increase the amount of water you give to your fern in a plastic pot. But either way, make sure your pot has good drainage holes and that the size of pot fits the size of your plant!
That’s it for my tips on how to repot a Boston fern in 5 easy steps. For more awesome tips and personalized help, join my facebook group “Houseplants for Plant Killers”! And if you liked this post, please share it in your favorite social media group. You never know which of your friends are secretly struggling with a fern!
Happy Digging!