How to Easily Propagate your Umbrella Plant (So it roots!)

schefflera cutting with labels showing where to cut the plant

Ever wondered how you can multiply your beloved umbrella plant? Well, you’re not alone. And the good news is, umbrella plants can be pretty easy to propagate! 

As with most plants, there are several propagation methods that work, although water propagation has been shown to be the easiest, most beginner-friendly propagation method with the highest success rates. That being said, here’s what we’re going to cover today…

  • Understanding Umbrella Plant Propagation
  • Different ways to propagate umbrella plants
  • Step-by-step guide to water propagation
  • Step-by-step guide to soil propagation
  • An overview on how to care for your new baby plant!

Understanding Umbrella Plant Propagation

Propagation is the scientific term for the process of creating new plants from an existing one. In simpler terms, it’s like giving birth to a new plant, but one that has the exact same DNA as the parent plant. This helps to maintain any desireable qualities (like variegation) that the mother plant may have.  And the good news is that umbrella plants, also called dwarf umbrella plants or schefflera actinophylla, are considered one of the easier plants to propagate.

Propagation can be accomplished using various parts of the parent plant. These are:

  • seeds (though this doesn’t produce an exact clone)
  • stem cuttings
  • leaf cuttings
  • root cuttings 

Today we are going to focus on getting schefflera cuttings from the stem portion of the plant since that is the easiest, most reliable way to get cuttings.

*Note: Umbrella plant sap contains calcium oxalate crystals, which can cause a mild allergic reaction to some individuals when it comes in contact with their skin. Please be sure to use gloves while taking cuttings to help keep yourself safe!*

*Note #2: This post contains affiliate links, which if purchased I will receive a small portion of the profit at no extra cost to you. This allows me to keep providing awesome information to y’all!*

Ways to Propagate Umbrella Plants

Different methods of propagation can be used for umbrella plants, and it all depends on what works best for you. Although water propagation is often mentioned as the easiest way to propagate umbrella trees (and it boasts a higher success rates), other methods like soil propagation or air layering are also worth exploring and can be fun to try out! For example, some people have told me that they have amazing success with soil propagation and will never go back to water propagation! Because of this, I would recommend you try a few different methods yourself to see which method you find the easiest and most successful for your dwarf schefflera.

Here’s a bit about the different (and most common) types of propagation:
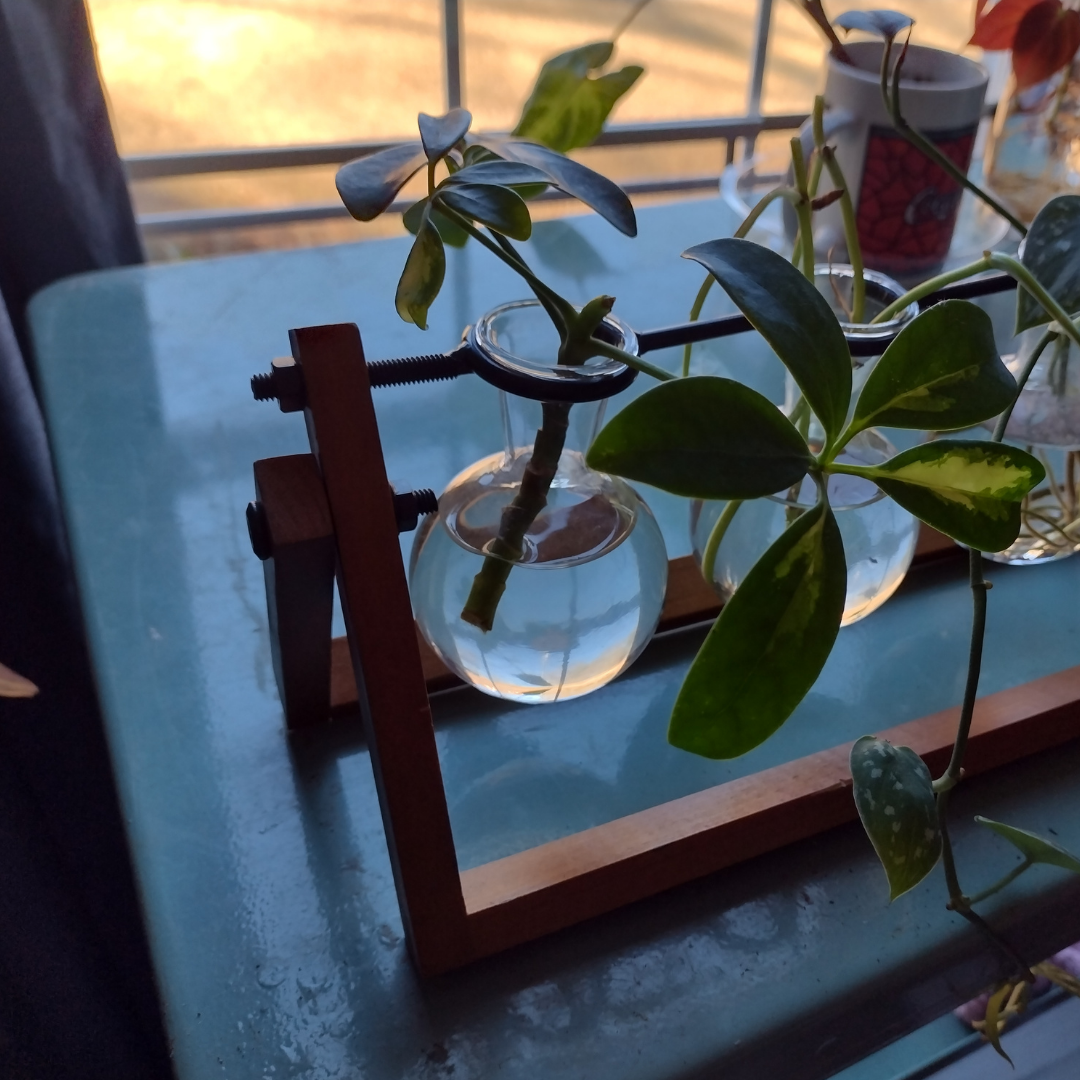
Water Propagation

Water propagation involves cutting a healthy branch from the plant and submerging it in a glass of water until roots begin to form. Then once roots form, you either transition your cutting into soil, or you grow it hydroponically.

Soil Propagation

Soil propagation has you plant your cutting directly into the soil. This saves a step, since water propagation requires the cutting to root in water and then be transitioned into soil, whereas soil propagation is in the soil to begin with and doesn’t need the extra transition phase.
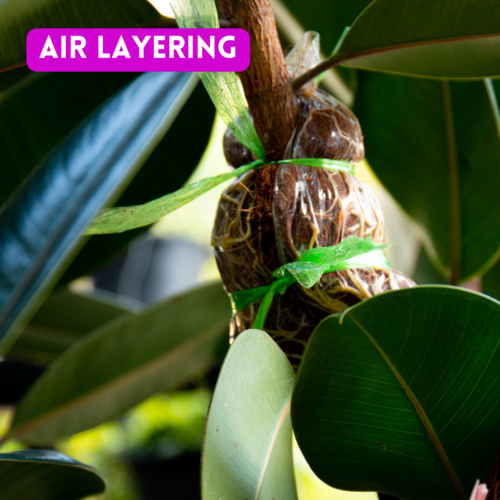
Air Layering

Air layering, on the other hand, is a bit more complex than the other two methods as it requires you to make a cut on the plant, then cover the cut section with wet moss until roots sprout. The benefit to air layering is that it keeps the cutting attached onto the parent plant until roots are formed, allowing it to get more energy from the parent plant while it is growing its roots. However, it is more difficult to master the correct technique of cutting the stem at the right depth, wrapping the moss around the stem portion, and keeping it moist enough to stimulate root growth. This is why it can have the lowest success rates for beginner propagators. However, those with experience can have great success with air layering.

It’s important to remember that these methods require patience and constant monitoring, ensuring that the conditions are perfect for the cuttings to root and grow into a new plant. In the next sections, we will focus on the step-by-step guide of water propagation and soil propagation, then discuss the challenges you might face and how to address them.

How to Water Propagate your Umbrella Plant

1. Select a Healthy Cutting

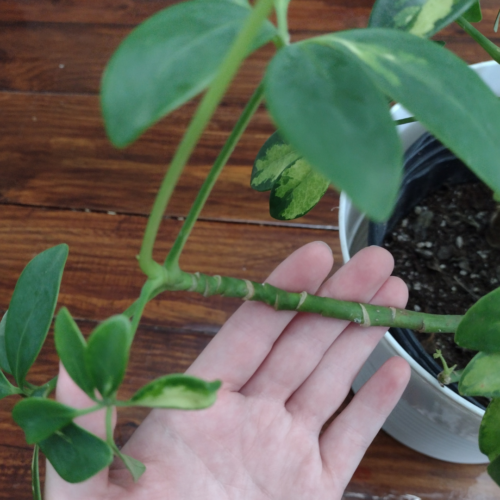
Choosing a healthy and robust stem cutting is the essential first step in umbrella plant propagation. Look for stems that are firm, green, and free from any signs of disease or pests. It is also best to propagate during the plant’s growing season from spring to early fall.

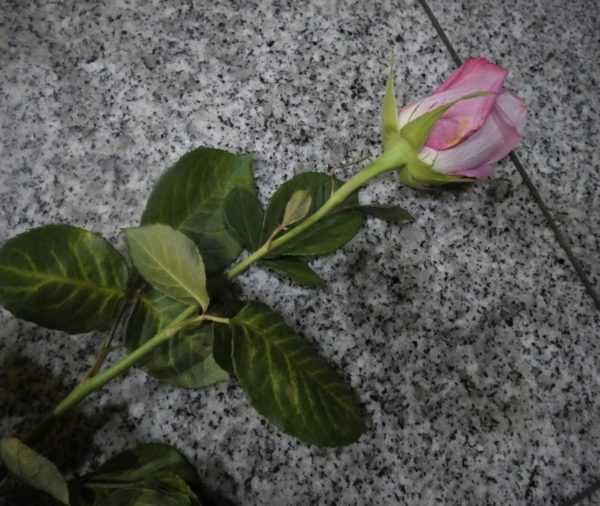
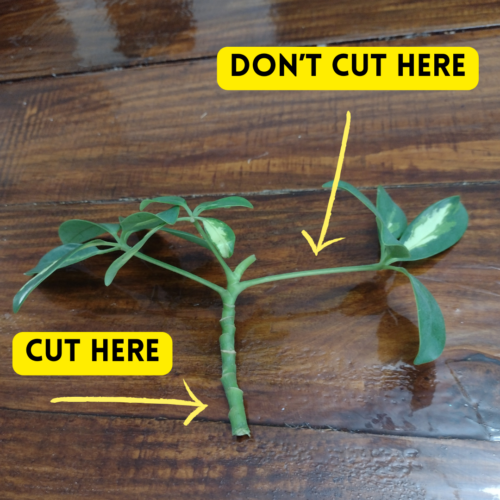
A good cutting should be about 4-6 inches long with several healthy leaves at the top. Make sure that you get some of the main stem of the mother plant and not just part of the leaf stem. If you think of it like a tree, its like umbrella plants have very long leaf stems. You don’t want just a leaf stem. You need part of the branch! This plant stem is essential. If you only have a leaf stem, then your cutting won’t root.

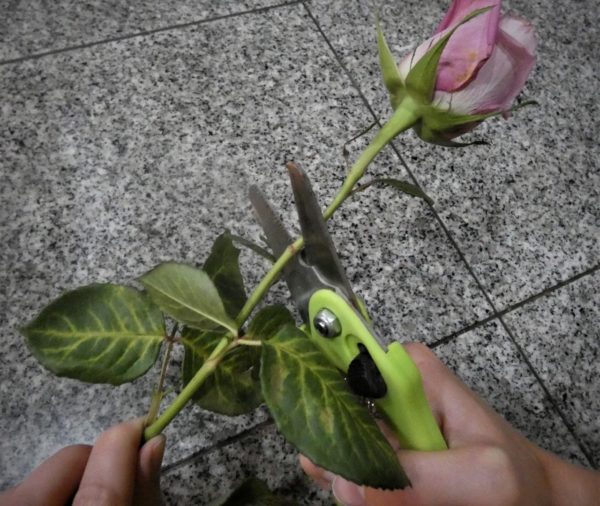
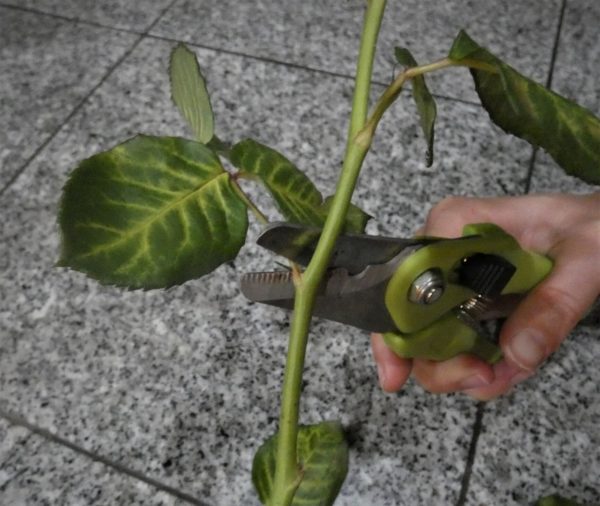
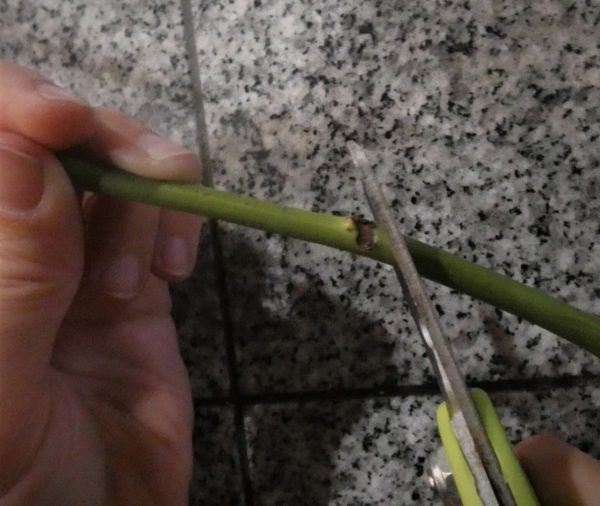
2. Use a Clean, Sharp Cutting Tool

To minimize damage and avoid spreading disease, always use a clean, sharp cutting tool when taking your stem cuttings. Consider disinfecting your tool with rubbing alcohol before each use. Then simply cut off your cutting! 😉
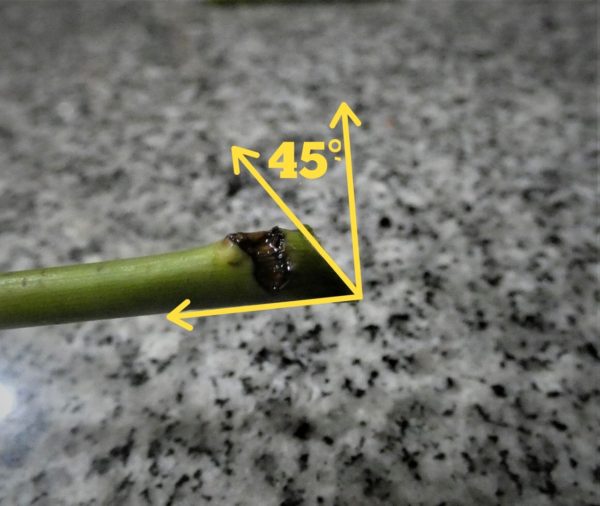
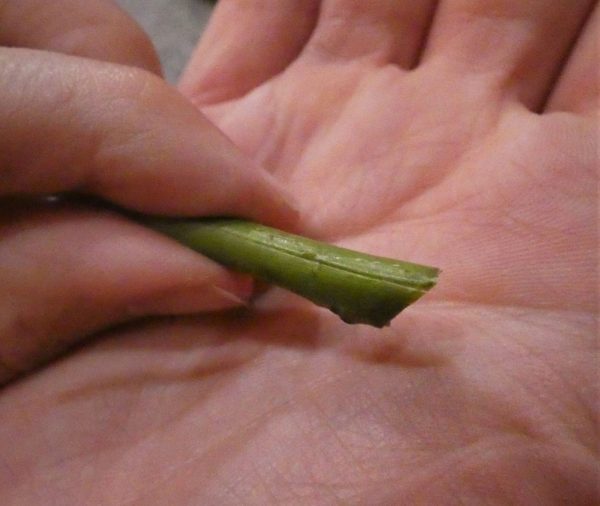
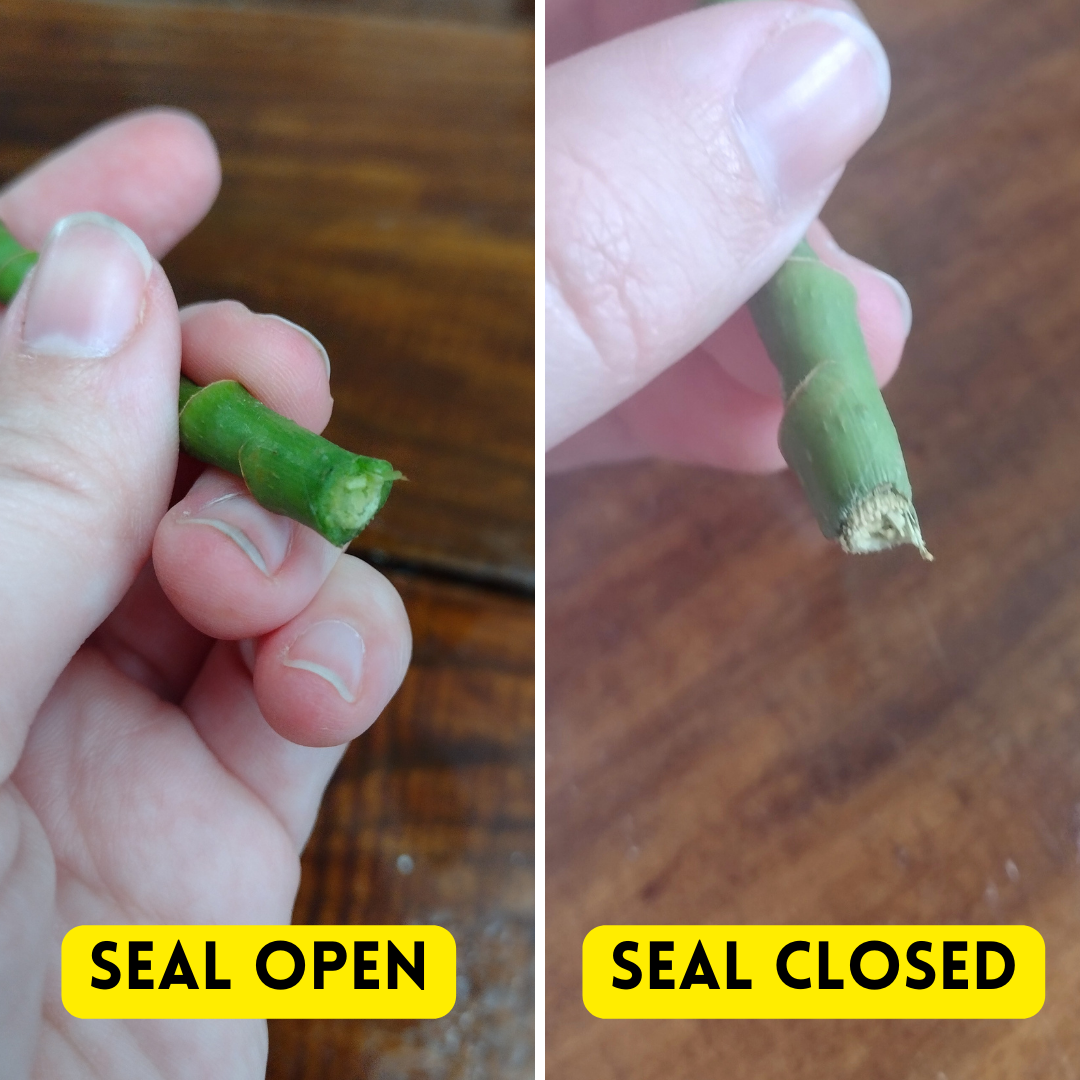
3. Let the Cut Seal

Umbrella plants aren’t as picky as other plants with this step, but you do still want to make sure that you let your cutting seal for a few hours for best results. This is done by leaving your cutting out in a cool, dry location and out of direct sunlight for a few hours. This will help to avoid rotting of the bottom portion of your cutting.

If your cuttings are consistently turning brown and mushy on the bottom instead of growing roots, then you aren’t letting your cut seal enough before placing it in water!
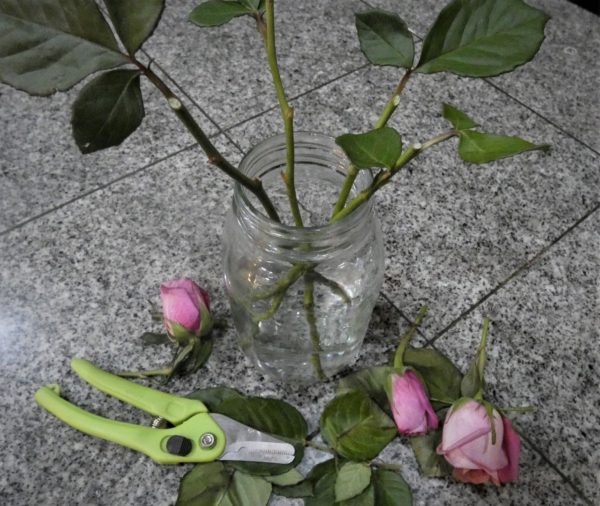
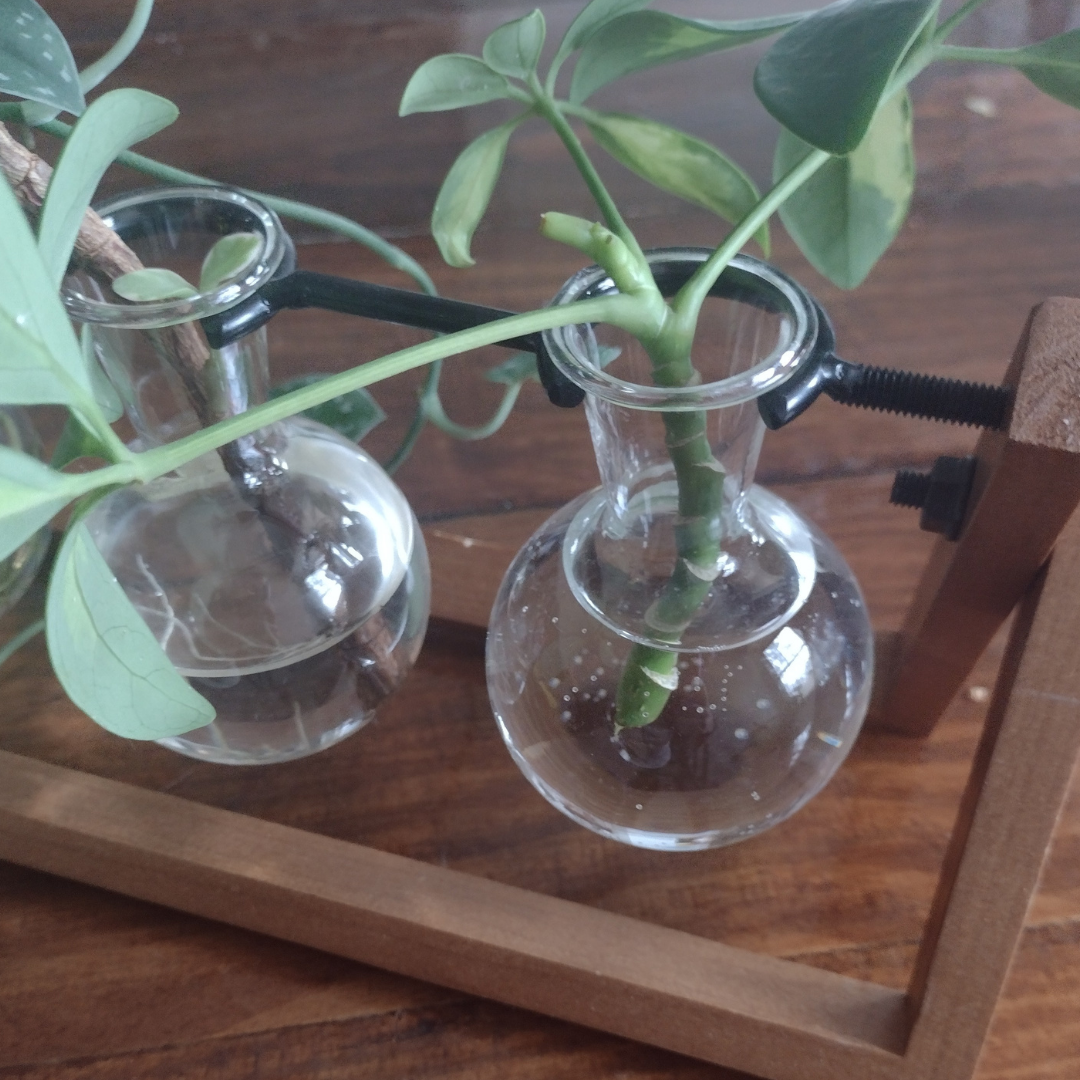
4. Place in Water

Place your cutting cut-side down into a container of water. Try to keep the leaves dry. I’ve heard some people say that they only use distilled water for propagating their cuttings, but with the umbrella plant I have personally used tap water and have never had an issue.

I have also heard some people add a few drops of SuperThrive to their water. Once again, I have never personally done this (going to experiment with it here soon!) but it sounds like it could be beneficial to your plants!

Then, make sure that you change out your water every week or so to keep bacteria from growing. If you start to see any bacterial or algae growth, you can clean out your container with a light bleach solution, then rinse thoroughly with water (several times!) and replace with clean, fresh water. Oh, and please be sure to remove your cutting during this time… bleach will not do good things to your little plant!

5. Create the Right Environment

Umbrella plants prefer warm temperatures and a humid environment, especially during the propagation stage. They are tropical plants, after all! Consider using a propagation box, a clear plastic bag, or simply mist your cuttings regularly to maintain high humidity levels. Just make sure that if you are increasing humidity with a bag or a box, that the sides do not touch the leaves. This could cause the leaves to turn brown and get bacterial spots.

6. Be Patient

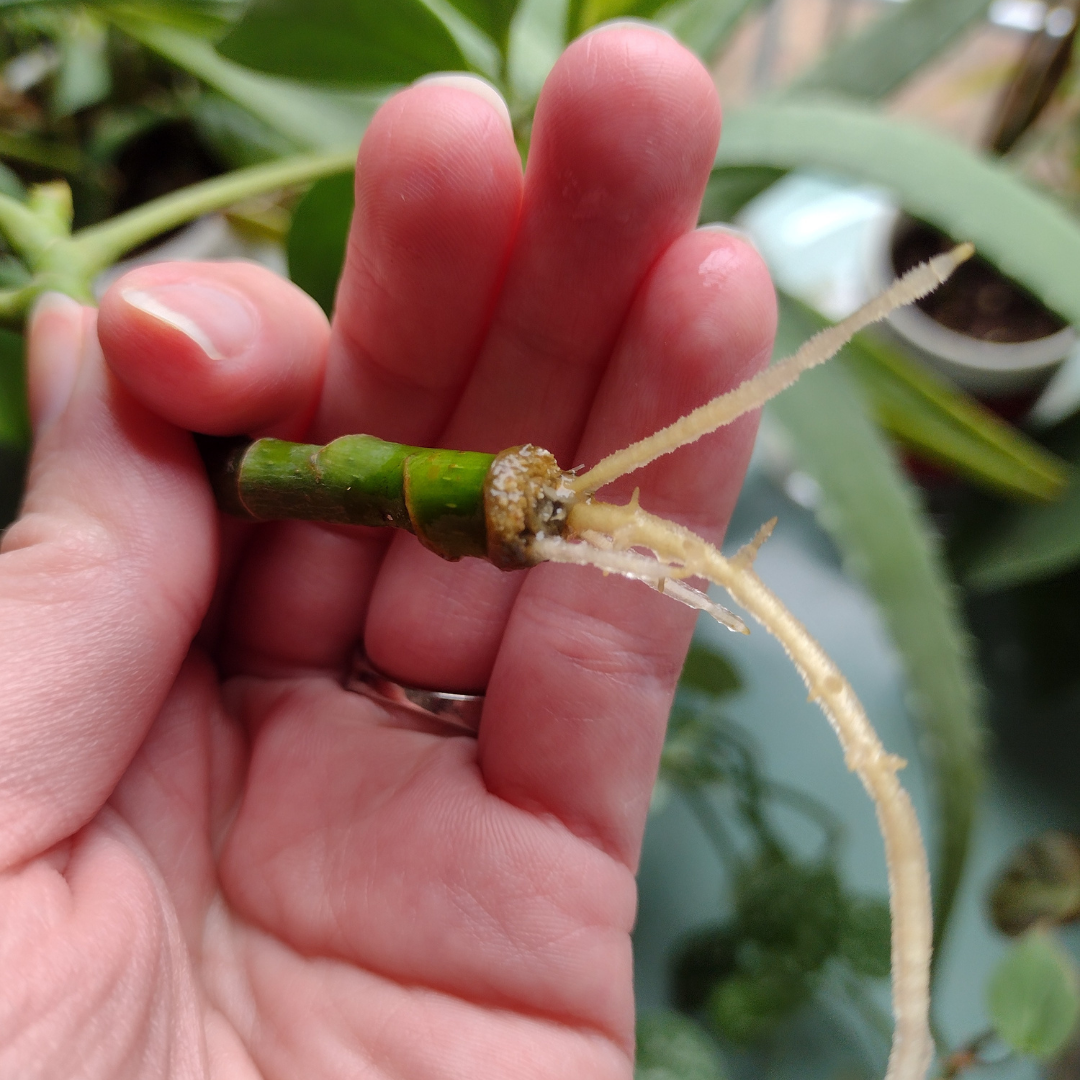
Propagation isn’t an overnight process. It can take a few weeks for stem cuttings to develop roots. You will begin to see the cut end form some white bubbly tissue. This is a good sign! This is where the cells are undifferentiating, to later redifferentiate into root cells. Basically it’s where your new roots are going to form. So don’t brush or scrub this off! 

This bubbly white tissue is different from slimy gunk. Slime is usually not the greatest and it’s best if you see it to gently rinse off as much as you can and to change out your water more frequently. It’s okay if not all of the slime comes off. It’s more important that you be gentle while rinsing off any excess.

Also note that yellow leaves does NOT mean that your plant is dead. Check the stem for a real indication of life. If the stem is still green and full, then you are good. If your stem starts to shrivel and/or your cut end begins to turn brown and mushy, then you will need to start over with a new cutting.
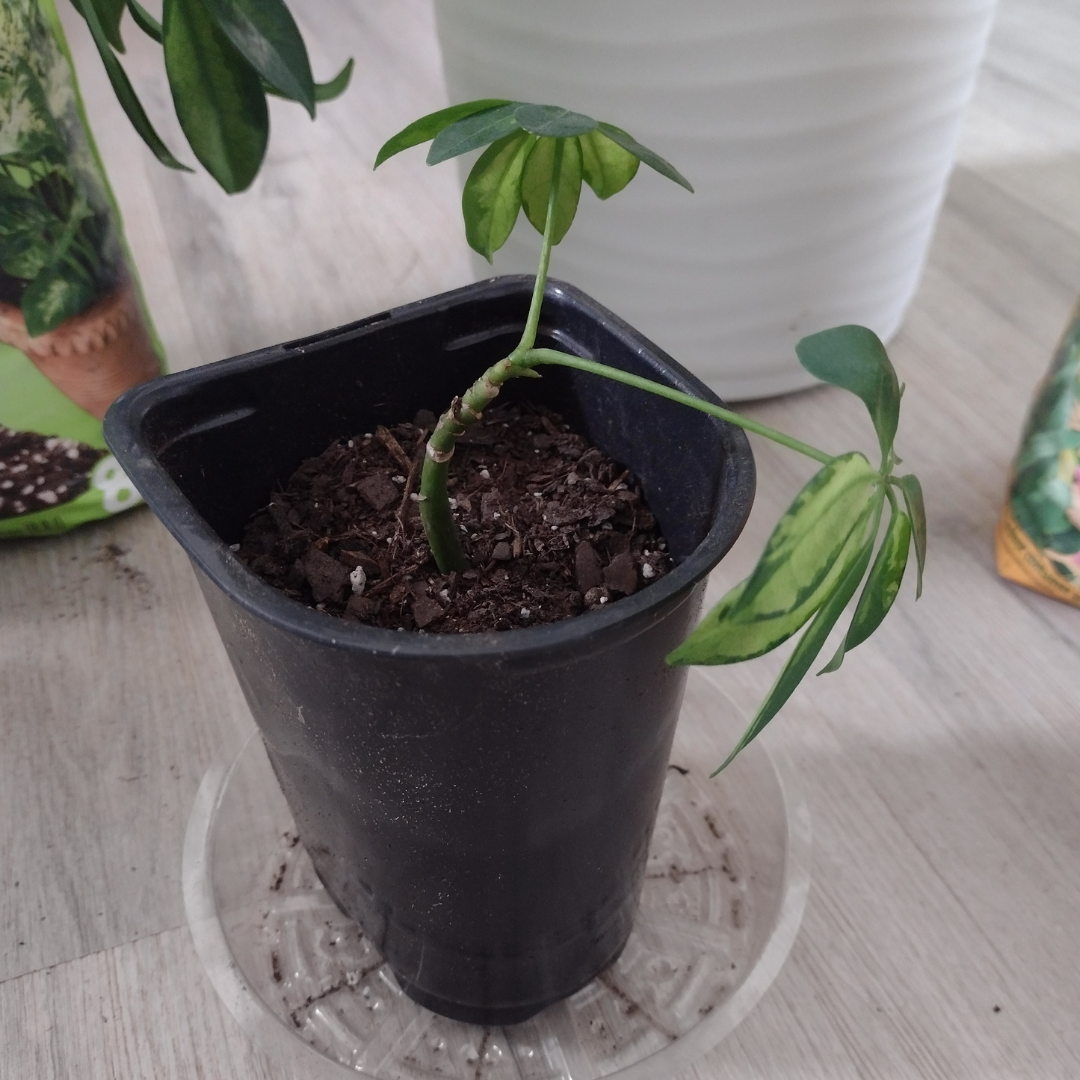
7. Place in Soil

Once your cutting has formed a good set of roots then it is time to plant it into soil (and not just one or two roots, I mean a root system where the roots are branching!). 

To put your cutting in soil, simply get a small, well-draining pot and place the soil loosely around the roots. Then compact the soil around the root system to hold it in place. Your roots need to have good contact with the soil, but you also need to be gentle while putting them in soil for the first time!

Once your cuttings are in your pot, make sure that you keep the soil evenly moist. This will be a bit more wet than you would normally keep your umbrella plant. It is just during the transition from straight water into soil. In a week or so you can start letting it dry out more and more between each watering. This is how you are going to help it successfully transition from water to soil.

8. Regularly Check for Pests and Diseases

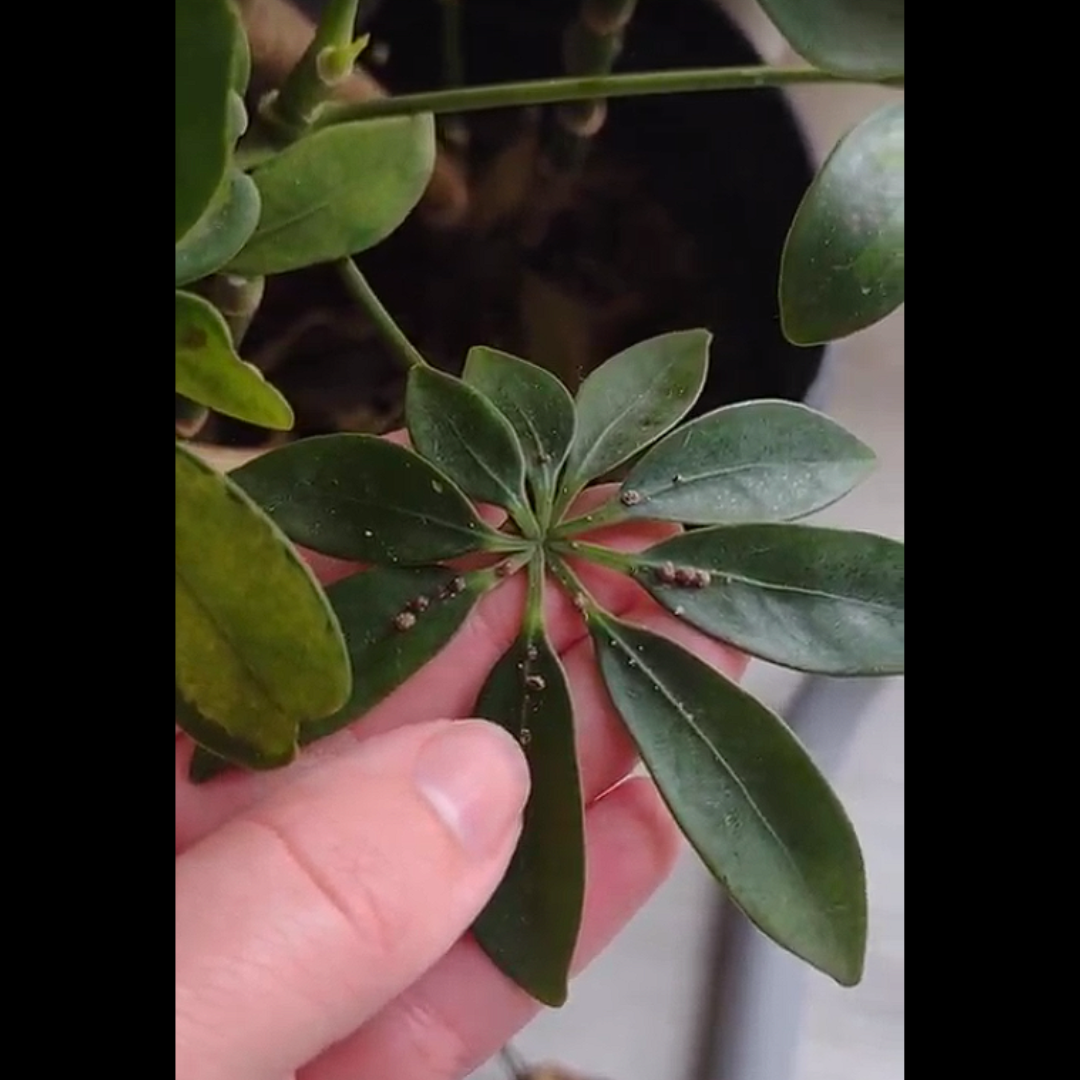
Regularly inspect your cuttings and the mother plant for signs of pests and diseases. Spider mites and scale insects are the main pests that affect schefflera. Early identification and treatment can prevent major plant health problems down the road!

How to Propagate your Umbrella Plant in Soil

To propagate your umbrella plant in soil, follow the above directions for taking the right cutting and using a clean, sharp cutting tool. 

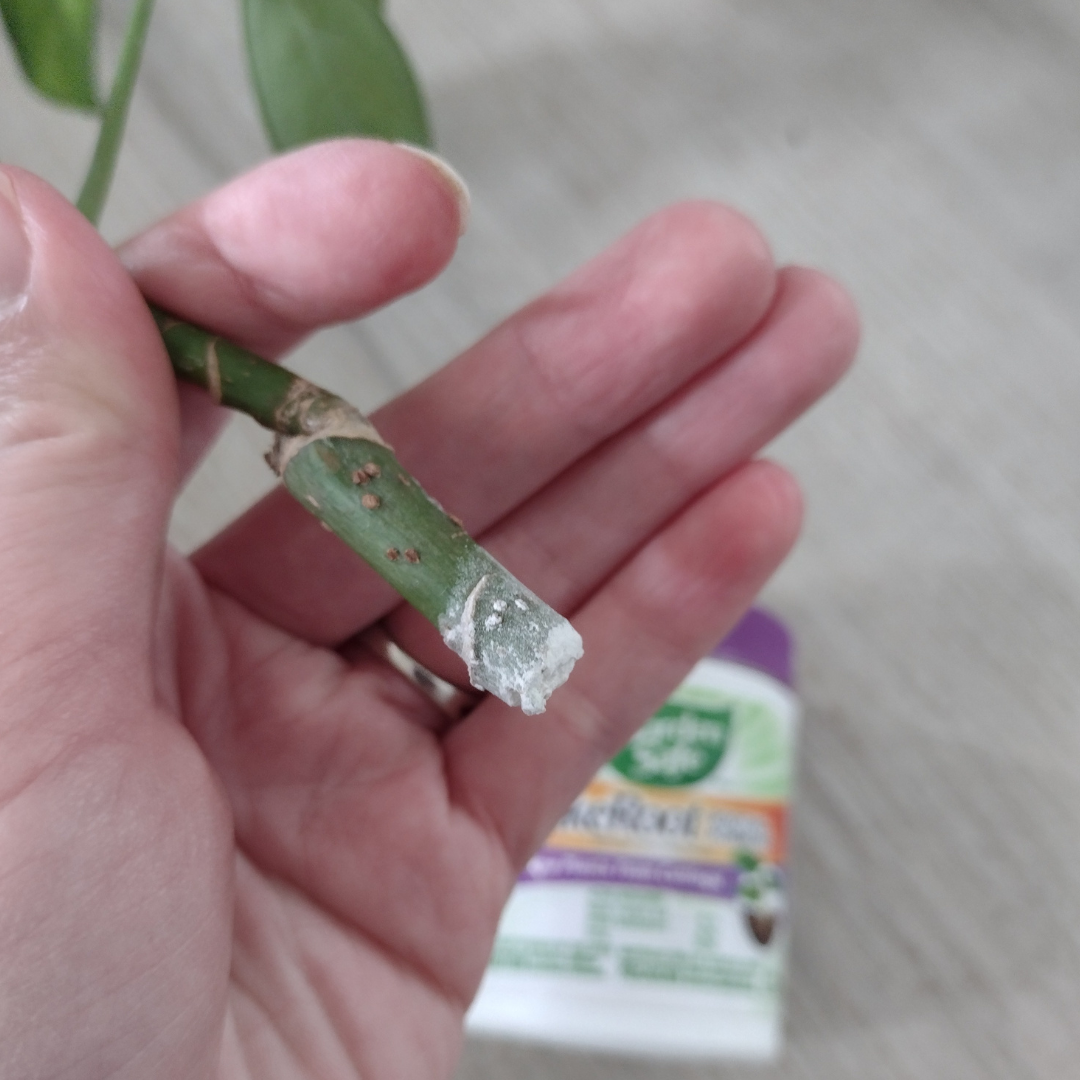
Use a small pot or container that has drainage holes and fill it with an airy, moist soil mixture (something with a lot of organic material such as peat moss, combined with sand or perlite to increase the drainage). Then make a finger-sized hole into the soil. By pre-making the hole, it will decrease the amount of rooting hormone that rubs off when placing it in the soil.

Next, dip the end of your cutting into rooting hormone, shaking off the excess powder, and place it into the soil. 

Keep the soil consistently moist and try to keep it in a humid environment. Consider keeping it in a propagation box or add a clear plastic bottle or bag around it. This will help to increase the humidity levels. 

Another tip… if you are struggling with low success rates with your soil propagation, consider using a soil heating mat. These mats keep your soil around 70 to 80 degrees fahrenheit, which will help stimulate your plant’s roots to start forming. Here is an affiliate link to the soil heating mat that I personally recommend. (Thanks for your support!)

Also, please resist the urge to tug on your cuttings to check for roots. This will tear your small, fine roots. Instead, look for new growth as an indication that roots are forming. This is the best way to keep your baby roots intact! Then, once you start seeing some new growth, consider incorporating a slow-release fertilizer to help it have the nutrients that it needs to support plenty of awesome new leaves!

Caring for Your Propagated Umbrella Plant

I wanted to note that once you’ve propagated your dwarf umbrella tree, it’s crucial to care for it properly to ensure its survival and growth. As umbrella plants prefer high humidity levels, it’s a good idea to try to increase the humidity around your newly propagated plant until it develops an extensive root system. This can be done through placing a glass or plastic dome over it, by misting it daily, or by placing it in a room that has higher humidity, such as a bathroom or a kitchen. Bright, indirect light is also ideal. Avoid low light conditions as this can cause your new plant’s growth to slow or to even stop completely.

Keep an eye out for small webbing in the leaf joints, which can be a sign of spider mites. These little guys are a common pest of schefflera plants and they can cause an otherwise correctly taken cutting to still fail. If you have spider mites, then don’t propagate your plant. First treat your plant with a mild insecticidal soap or horticultural oil until all of the insects are gone. After all, an unhealthy plant will have a harder time during propagation.

Continue to regularly check your plant for signs of distress such as yellowing leaves or drooping growth. These signs could indicate root rot from too much water, inadequate lighting, or pest infestations.

For more in-depth care information for your schefflera houseplant, check out my post on Umbrella Tree Plant Care!

Conclusion

That’s it for our guide to umbrella tree propagation! I hope you have great success in turning your mature plants into lots of new little house plants! And for more houseplant inspiration, check out my post on the 31 Best Indoor Plants!

Happy Digging!

Umbrella Plant Propagation FAQs

How long does it take for an umbrella plant to root in water?

Rooting time depends on the conditions and health of the original plant, but most umbrella plant cuttings start developing roots in water within 2-4 weeks. When the roots are about an inch long, they’re ready to be transferred to soil, though I usually wait until the roots are about 3 inches long to be safe!

What part of the umbrella plant is best for propagation?

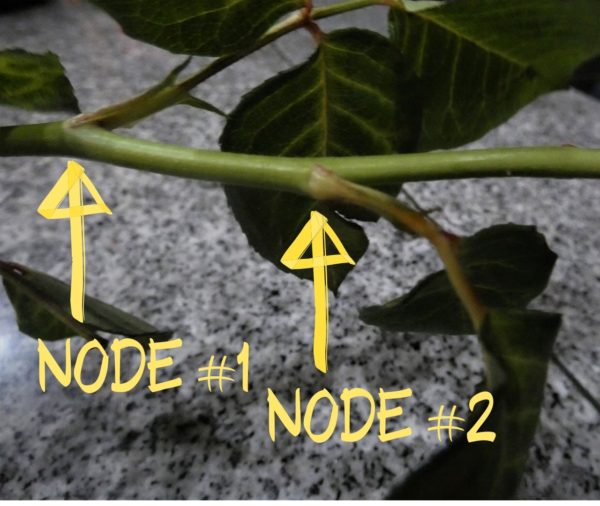
The best part for propagation is typically a healthy stem cutting. You’ll want to cut just above a leaf node (making sure to get a portion of the plant stem, not just the leaf stem), and the cutting should have at least two sets of leaves. This is the most effective method for ensuring successful propagation.

Can I propagate an umbrella plant in soil?

Yes, you can propagate an umbrella plant in soil. While it may not provide the same success rate as water propagation, it can be done. Be sure to keep the soil moist and place the cutting in a warm, brightly lit location out of direct sunlight. Also consider using a heating mat if you want to boost your success rates with soil propagation.

How do I know if my umbrella plant cutting is rooting?

You can observe the bottom of your cutting in water to see if small roots are beginning to sprout. If rooting in soil, you may notice new growth on the stem or leaves, indicating successful rooting. Remember, patience is key, as it sometimes takes young plants a few weeks before they show any progress. And be sure to never pull on your soil cuttings to check for roots. This can damage any fine, small roots that may have already formed!

3 Simple Steps to Grow Roses from Cut Flowers

Grow Roses from Cut Flowers Featured Image

Hey everyone! And welcome again to another awesome post! Today I wanted to talk about how you can actually grow roses from cut flowers! Like actual rose bushes from your bouquets! Let’s get started!

So first, I have to admit, when I heard about this cut flower-to-plant idea, I was pretty skeptical. I did some research and saw that yes, some people were actually having success growing their roses into plants, and after several months of testing, I finally did as well. But you have to do it right, or you’ll just end up with a bunch of dead stems…

Here are the 3 steps:

  1. Prepare your Cutting
  2. Root in Water
  3. Transplant in Soil
Click here to subscribe

Step 1: Prepare your Cutting

In order to be successful, you NEED to have a good, healthy cutting. Select a cut flower that hasn’t begun to wilt yet. Also, make sure that the stem doesn’t have any brown portions in the middle.

For this post, my cutting’s leaves had a bit of yellow in the veins. I normally prefer them to not have any yellow in the leaves, but they were the only cut flowers I had at the time… that being said, I only kept the best leaves on each stem…

How to Grow Roses from Cut Flowers - Step 1: Prepare your Cutting

Next, cut off the main flower. I know this can be hard to do, but trust me… the cutting won’t have enough energy to continue to bloom and to grow a root system.

Also, try to cut just above a node on the stem. (A node is where there is a growing point… usually where a set of leaves connect to the stem…)

Cut off the flower
Nodes

Once you’ve cut off the flower, find the section of the stem that is the older, more woody section. The section of young growth that connects to the actual flower WILL NOT root. So make sure that you use the older base of the stem and not the young, flexible stem at the top.

Remove the majority of the leaves from your stem. I like to leave 1-2 branches of leaves, but this should only contain about 2-3 leaves in total. If there are any large leaves, cut them off, or trim them to be smaller.

Cut off leaves

Then, cut the bottom of your stem at a 45 degree angle. This angle will maximize the area of stem that is in contact with your water and will maximize the area that is available to root!

Cut end of stem
How to Grow Roses from Cut Flowers Step 1: Cut base at 45 degree angle

Last, cut light, superficial slits (just a scratch) up the sides of your stem. This will also increase the area that is available for more water to enter the plant and for more roots to form!

Cut superficial slits into base

Step 2: Root the Cutting

Over the past year or so, I’ve experimented with several different types of rooting methods: in soil, in straight water, and in a hydroponic-style system. Rooting stems in soil proved to be difficult to keep the soil moisture levels evenly and lightly moist, so the BEST way to root stems was definitely in straight water or using a hydroponic system.

To root your cuttings in water, simply place it in a thin, tall container of water and make sure that all of your leaves stay dry. Switch out the water every few days to keep it aerated and free from bacterial growth. Then simply wait several weeks for either roots or scar tissue to form.

Grow Roses from Cut Flowers Step 2: Root in Water

A hydroponic system also works well for rooting our cuttings. Watch the video below for an easy, effective way to root your cuttings using a plastic pot, perlite, and a large plastic bag. Just be sure to change out your water every few days with this system as well.

Step #3: Transplant in Soil

Once your cutting has rooted, transplant it into a pot with soil. To have a successful transition, keep the soil from completely drying out in between watering for the first few weeks. The longer it has been in the soil, the more dry it can stand to be between watering. Your final transition should be to let your soil dry down to the top 1 inch in between watering, but this should only be done once the cutting has fully rooted (from several weeks to months depending on how many roots your cutting had when it was placed in soil).

If you are planning on planting your cutting outdoors, then make sure that it has fully rooted and has some new growth before you move it outdoors. Then, place it outdoors for only a short period of time. Then slowly increase the time it is outdoors until it is used to being outdoors 24/7.

One more thing to consider is that your variety of rose might not do well in your particular climate. Try to keep it out of hot, direct sunlight if you live in hot climates. On the flip side, bring your plant indoors or wrap it to give it additional protection from freezing temperatures. If you want to know which rose varieties will do well in your area, check out this map that shows which roses do best in different regions of the USA! (For all my readers outside the USA, you can still compare the USA hardiness zone and climate to your own local conditions!)

That’s it! And remember, the success rate is going to be low because of the anti-rooting chemicals they use on roses before they are shipped. This is why rooting your cut roses will take a lot longer and will be less successful than if you were to simply root a cutting from a bush. If you’re lucky enough to have a cutting though, check out my post on the Easiest Method to Grow Rose Bushes from Cuttings! Good luck, and let me know in the comments how it goes! Then feel free to subscribe to my email list to receive even more awesome tips and instructions for your plants!

Happy Digging!

Click here to subscribe
How to Grow Roses from Cut Flowers Pinterest Image

3 Easy Ways to Propagate Christmas Cactus

Hey everyone! Welcome back to The Girl with a Shovel! Today I wanted to tell you all about Christmas Cactus propagation: when and how to successfully propagate your Christmas cactus!

Note: This post is written for Christmas cactus, however, everything discussed can also be used for a Thanksgiving cactus as well. Propagation methods are the same for both.

The springtime is usually the best time to propagate your Christmas cactus! You want to make sure that it is several weeks after the bloom time and at least a month before the fall dormancy period (this is when you should be giving it light treatment to stimulate Christmas blooms).

There are 3 different ways to propagate a Christmas cactus. These are: upright in soil, flat in soil, and in water. But first I wanted to cover how to get a healthy cutting, and then we will get into these three different rooting methods.

Click here to subscribe

Getting a Healthy Cutting

Each Christmas cactus branch is made up of several sections (or pads) linked together. At the very bottom of the pad (where it connects to another pad) is where you can get roots to grow. But the tricky part is that you need to separate the pads without tearing the bottom of the pad. If the bottom of the pad is damaged in any way, then the cutting will most likely fail.

If you’ve ever propagated succulent leaves, then you’ll notice the process of pulling off the leaves is very similar to pulling off the cactus pads. For a visual of good versus bad leaf cuttings, refer to my post Propagating Succulents.

The easiest way to ensure you get the complete, undamaged cactus pad is to gently twist it away from the bottom pad. By gently twisting the top pad, your cactus pads should easily come apart – no tearing involved. Got it?! Now let’s work on planting your cutting…

How to take a successful cutting for Christmas Cactus propagation.

Method #1: Propagating Upright in Soil

This method is the best if you’ve got some large cuttings (around 4 pads each) and if you have good, whole ends on your cutting (aka you took good cuttings without tearing the bottom of the pad).

Take your cutting and lay it in dry location for 1-2 days. Be sure to keep them out of direct sunlight as well. This resting period is important as it helps the plant transition from growing shoots to thinking about growing roots.

After 1-2 days, place your cutting into fresh potting soil (cactus & succulent soil mix is best), and place the end far enough down that the soil covers the bottom pad. Then water it lightly, letting it just barely dry in between watering. Give it 2-3 weeks for roots to form.

Low on cactus and succulent soil? Here’s how to mix your own! DIY SUCCULENT SOIL RECIPE!

Method #1 Summary

  • Used for large cuttings (4 pads each)
  • Dry for 1-2 days
  • NO direct sunlight
  • Use light, well-draining soil
  • Keep LIGHTLY moist
Christmas Cactus Propagation Method #!: Upright in Soil

Method #2: Propagating Flat (On Top of Soil)

This method is best for you if you want to do soil propagation, but you have smaller cuttings (2-3 pads), or if your cutting’s bottom pad has been damaged in any way. I personally used this method for a section of 2 pads that were cut off my parent plant and was missing the bottom section of the lower pad. (I wasn’t the one who took the cutting, I swear! Haha!)

Simply dry out the cutting for 1-2 days (again avoiding direct sunlight). Then, instead of planting in the soil, you will place the cutting horizontally on top of the soil. This also needs a light soil, such as a cactus & succulent soil mix. Make sure that there is good contact between the soil and the point where the 2 cactus pads meet. This is where the new roots are going to come from. Then keep it lightly moist and your cutting should root within 2-3 weeks.

A special precaution for this type of rooting… because the cactus pads are laid horizontally against the soil, it increases the chances that your cactus pad gets too wet and begins to rot. To avoid this, try to only get the soil wet when you water your succulent. Try to keep the actual cutting dry. If you find this difficult, then I would suggest you use one of the other two propagation methods.

Method #2 Summary

  • Use with shorter cuttings (2-3 pads)
  • Let dry for 1-2 days
  • NO direct sunlight
  • Lay horizontally on top of the soil
  • Use light, well-draining soil
  • Keep LIGHTLY moist
  • Get soil wet, but keep cutting relatively dry
Shorter cuttings with no direct sunlight laying horizontally on top of the soil

Method #3: Christmas Cactus Propagation in Water

Christmas cactus propagation in water has been proven to be the fastest way to propagate cuttings. Watching the video below, you’ll see how Christmas cactus cuttings in water grow roots weeks before the Christmas cactus in soil. However, when you root your cuttings in water, you will still have the extra step of transferring your cuttings to soil, which can be a delicate process. So be aware of the advantages and disadvantages of each method and choose your propagation method accordingly.

The key to having success with water propagation is to have a good callus. To do this, first, get a good cutting by following the instructions above. Then, make sure that you leave it out to dry. Keep it out of direct sunlight and let it dry to the point that the leaf gets thinner, but put it in water before it gets any wrinkles. If it starts to get wrinkle lines, then you’ve left your cutting out a bit too long.

Once your cutting has dried enough (but not too much!), it will have formed a good enough callus that you can put it in water without the risk of it rotting. If your cutting does rot, then this is a sign that it didn’t form a good enough callus and it should be left out to dry longer next time.

Leave your cutting in water for several weeks, or until it has roots that are about an inch or two in length. While your cutting is in water, make sure that you change out its water every few days. This keeps the water fresh and cuts down on the chances that you will have problems with bacterial rot on your cuttings or on your roots.

Once your cuttings are ready to pot, use a well-draining soil (such as cactus & succulent soil mix, or regular soil mixed with perlite), as well as a well-draining pot. This will be extremely important in successfully transitioning your plant from water to soil.

Transitioning from Water to Soil

As you transition your cuttings, plant them in soil just like you would with any other cutting, then water it thoroughly. Keep it in a warm location with a fair amount of indirect light. At this point it can also withstand some direct morning or evening sunlight as long as temperatures don’t get too hot.

Let your plant’s soil only get slightly dry before watering it again. This means that you will be watering these cuttings a lot more than your regular Christmas cactus. Slowly decrease your watering until your plant can withstand the soil becoming almost dry between watering. This transition should be over the course of a few months and will slowly transition your plant from being in water to being in soil.

Method#3 Summary

  • Let cuttings form a callous
  • Switch out water frequently
  • Use well-draining soil
  • Keep moist when potted in soil
  • Slowly transition from water to soil
Letting cuttings form a callous and kept moist in a pot in soil

So that’s how to have successful Christmas cactus propagation! Remember to choose the method that is best for your situation. And let me know how it goes! Leave any additional questions or comments below. And feel free to join my email list for more awesome tips on how to keep your plants alive and healthy!

Happy Digging!

Click here to subscribe
Christmas Cactus Propagation Pinterest Image

Haworthia Propagation

Haworthia Propagation Cover

Welcome back everyone! Today I’m going to show you how to propagate your favorite Haworthia plant! There are two different ways that Haworthias can grow… either from seed or from separation of plant material. I’m not fortunate enough to have some Haworthia seed on hand to show you, but I will talk about the two most common types of propagation through plant material: propagation through leaf cuttings, and separation of offsets.

**Note: This post contains affiliate links, which if purchased, I will receive a portion of the profits. This helps me to keep providing awesome information to all of you!**

Click here to subscribe

Haworthia Propagation through Leaf Cuttings

Haworthias can be propagated through leaf cuttings just like many other succulents. But beware because this plant is difficult to get the entire leaf off without ripping off the tip of the leaf. Because of this, most people choose to cut the leaves off with a small precision knife, cutting off a bit of the stem in the process to ensure that it will propagate. Others choose to propagate their entire plant at once and cut apart the inner stem as they separate all of the leaves.

Haworthia Propagation through Leaf Cuttings

Either way, this method is tricky and success rates are low for the zebra-type haworthias. Leaf cuttings are more successful in the round, thicker-leaf haworthias. That being said, if you don’t have any offshoots (or pups) on your zebra haworthia, then carefully remove a few leaves at the base of the plant. Then if the leaves aren’t successful, the plant should give you some new pups where the leaves were removed!

Just make sure that the entire leaf tip is removed and undamaged for this process to work. For step-by-step instructions, refer to my post on succulent propagation here!

Haworthia Propagation

Haworthia Propagation through Division of Offsets

In time, most Haworthia species produce offsets (little baby clones of the parent plant). This method of propagation is much easier and has much higher success rates than the leaf cutting propagation. These can be separated and potted in the following steps…

  • #1: Wait until the offset has at least four leaves to ensure that it is big enough to have formed its own roots and to survive the separation.
  • #2: Loosen the soil with water, then gently remove. We want to get as many of the roots out as possible so loosening up the soil first will be very helpful in saving those little guys.
  • #3: Gently brush the soil from the roots and separate the offset’s roots from the parent plant’s roots.
  • #4: Find where the offset is connected to the parent plant and gently cut them apart.
  • #5: Replant your Haworthias, making sure they are in well-draining soil and in small pots. Ignoring either of these will cause your plants to rot (and no one wants that!)
Haworthia Propagation through Division of Offsets

I hope you’ve enjoyed this post! Please leave any questions or comments below! I love hearing from you! Have a great day and good luck with your Haworthia propagation! And for Haworthia care information, check out my post on zebra plant succulent care!

Happy Digging!

Click here to subscribe

Propagating Succulents

Propagating Succulents: A step-by-step tutorial

One great things about succulents is that they can be easily multiplied into many succulents! This task may seem daunting for people who have never done it before. But with this step-by-step guide you are sure to have success! So get started today and try your hand at growing your very own succulents!

*Note: All of the succulents pictured below were bought from The Succulent Source, where you can buy leaves, cuttings, and full-sized succulents for cheap! My personal go-to for succulents!*

**Note: This post contains affiliate links, which if purchased, I will receive a portion of the profits at no extra cost to you. This helps me to keep providing you with this awesome information!**

Click here to subscribe

Propagation: the act or action of propagating: such as

  • increase (as a kind of organism) in numbers
  • the spreading of something (such as a belief) abroad or into new regions
  • enlargement or extension (as of a crack) in a solid body

– Merriam-Webster Dictionary

Propagating Succulents from Leaves

Propagating Succulents Step 1: Get Quality Leaves

One of the most critical parts of growing new succulents is to get a good leaf cutting. To do this, gently hold the leaf and wiggle it back and forth until it gently detaches from the stem. Usually lower leaves are a lot easier to remove. It might take a couple of tries before you start getting good cuttings. This is because you need to remove the leaf right at the joint without letting the tip get torn. If some of the stem is attached, this will still work. But if the leaf tip is torn, then your leaf will just shrivel up and die. No leaf stem, no new succulent.

Propagating Succulents from Leaves good and bad example
Propagating Succulents Step 2: Dry

Leave your leaves to dry (haha!). Do not skip this step! The tear that you have made on the succulent needs time to dry before it is placed in soil or gets wet. This allows it to form a seal around the tear (kind of like a scab). This helps protect the leaf from too much water or from bacteria getting in. Simply leave the cutting out in a location where it will be protected from any direct sunlight. Leave it for about 24 hours before moving on to the next step.

Propagating Succulents Step 2: Dry
Propagating Succulents Step 3: Place on Top of Soil

Some people like to place their cuttings into the soil, but this is not necessary and may actually increase the number of cuttings that rot. By simply placing your leaves on top of the soil, the root will still be able to grow out of the leaf and down into the soil. Make sure that the container is shallow and has good drainage. I use cactus and succulent mix potting soil to ensure that there is good drainage. This also lowers the rate of leaves rotting.

Propagating Succulents Step 3: Place on Top of Soil
Propagating Succulents Step 4: Water

Water lightly for several weeks until roots and rosettes form. I personally use a spray bottle to gently water the plants several times a day. Make sure that the soil dries between watering. Excess moisture will kill your leaves faster than anything else! Once the roots have become established, they can handle a bit more water at a time and you can lower the times of watering to just once a day. Also keep out of direct sunlight and place in a warm location. All of these will help to keep the succulents happy and thriving.

Propagating Succulents Step 4: Water
Propagating Succulents Step 5: Re-pot and Enjoy!

Once the rosettes have formed and the root systems have developed, the new succulents can be removed from the shallow container and planted in individual pots. Make sure that these pots are still small (proportional to their size). As the succulent grows, it can be repotted into larger containers or in group plantings. Enjoy your new succulents!

Propagating Succulents from Stem Cuttings

When you order succulents as cuttings or take cuttings of your own succulents, the process is pretty simple… First you need to let the cutting dry out (just like the leaves). If you had a cutting ordered, it should already have dried enough. Next, you plant in cactus and succulent potting mix and water like normal. It should develop roots quickly. And that’s it! This is one reason why a lot of people like to order cuttings. They are much faster and easier to grow! This is where I bought mine!

Propagating Succulents from Stem Cuttings

Well, I hope you all enjoyed this tutorial on propagating succulents! And be sure to check out The Succulent Source for some awesome, cheap succulents! I got mine in the middle of winter and they’re still doing great! Also, for additional care info, check out my post on Succulent Care Tips! And feel free to leave any additional questions, tips, or comments below!

Happy Digging!

Click here to subscribe

Propagating Pothos Vine

How to Grow Pothos from Cuttings Image

Today I wanted to demonstrate how to grow one of my favorite indoor plants! Yep, that’s propagating Pothos vine! Also called Devil’s Ivy, this plant is one of the easiest plants to grow, earning it a spot on my hard to kill houseplants post, as well as my plants for dark apartments post. But for this post I wanted to tell you all how to grow your own Pothos vine. Trust me, it’s incredibly easy and you’ll have a beautiful, thriving plant in no time!

**For info on how to take care of your Pothos vine, check out my post Pothos Vine Care!**

Basically, there are two ways to propagate Pothos (aka, grow a new Pothos)…. with water, or with soil. But because most of you here are plant beginners, lets talk about water first (which is much easier), and then we’ll move on to the more advanced soil.

**Note: This post contains affiliate links, which if purchased, I will receive a portion of the profits at no extra cost to you. This helps me to keep providing you with this awesome information!**

Click here to subscribe

Propagating Pothos in Water: Step 1 – Get your cutting

A good plant needs a good start. Select a healthy plant to trim from with leaves that aren’t diseased or yellowing. Cut about 3″ of stem length, making sure that there is at least one leaf node (where the leaf attaches to the stem). Personally, I like to take longer cuttings (they usually root faster) that have about 3-4 leaf nodes. This also makes it easier to keep upright.

Propagating Pothos in Water: Step 1 – Get your cutting
Pothos leave nodes one, two and three

Propagating Pothos in Water: Step 2 – Place in water

Now this step is pretty self-explanatory. Just make sure that if there are lower leaves that would be submerged in the container, make sure to remove them. If the leaves are left submerged, they may rot. Which doesn’t look that great. Believe me.

Propagating Pothos in Water: Step 2 – Place in water

Propagating Pothos in Water: Step 3 – Plant

After a couple of weeks your Pothos vine will have rooted. So easy! I know! Now at this point, you can either plant your Pothos in soil, or you can keep it in water for life. Pothos does well in both water and soil, but make sure that once it is established that you don’t switch the growing media. Switching from water to soil (or vice versa) later in this plant’s life will cause it to decline in health. It might recover, but it might not. Those are the risks. But if you want to switch media later, you can always grab another cutting!

*This image is of some pothos cuttings I rooted last year. These can be planted at this point of development, or they can wait another week or two and planted then (if planting in soil).*

Propagating Pothos in Water: Step 3 – Plant

Propagating Pothos in Soil: Step 1 – Get your Cutting

For a soil cutting, follow the exact same directions as for the water cutting. This one is also important to remove any leaves that will be covered in soil, as they will rot. And remember, family members/roommates/friends don’t like to see rotting plants!

Propagating Pothos in Soil: Step 1 – Get your Cutting

Propagating Pothos in Soil: Step 2 – Rooting Hormone

One thing that always helps you have success with cuttings is rooting hormone. Here’s a link to the one that I use! Simply dip the cutting into the hormone and shake off any excess powder. Make sure that you have at least one leaf node (the section of the stem where the leaf attaches) covered with the rooting hormone. I usually have two or three nodes on my cutting (stripped of the leaf) just to make sure that one of them roots successfully.

Propagating Pothos in Soil: Step 2 – Rooting Hormone
Garden Safe Take Root: Rooting Hormone

Propagating Pothos in Soil: Step 3 – Plant

The last step is to plant your cutting in soil. Do not skip this step!!! (Lol.) Make sure that at least one leaf node is submerged into the soil. As for pots, try to use a shallow container that drains well. I also prefer to use a well-draining potting mix in order to limit the chances of the cutting rotting. (I suggest the cactus & succulent potting mix, or regular potting soil mixed with coconut coir). The trick to watering your cutting is keeping it consistently lightly moist. Don’t overwater. If your pot/container doesn’t dry out within 2 days, then you’ve added too much water. You want to have to water it every day or two. This will prevent rotting of the cutting while it still doesn’t have any roots to take up the water. If you aren’t successful with your cuttings, try one of the soil options I listed above, as well as switch to a smaller container with plenty of drainage.

Propagating Pothos in Soil: Step 3 – Plant

That’s it! It’s an easy, 3-step process, whether you choose soil or water. And like I said, if you are new to this, try the water option. It has a much higher success rate! So have fun growing this awesome, easy vine, and for tips on how to take care of your Pothos, check out my post on Pothos vine care!

Happy Digging!

Click here to subscribe

*Here’s a Pothos that I grew from a cutting less than a year ago!*

Here’s a Pothos that I grew from a cutting less than a year ago!

Grow Perfect Roses from Cuttings

So here’s how this whole grow roses from cuttings thing came about…

My mom was talking the other day about a rose bush that her dad had planted in one of the cousin’s yards. See, he had passed away about 20 years prior and she always remembered this rose bush he had planted. She was hoping that they would take good care of it in order to make sure that it stayed alive. Every year or so she would visit the house and would always cross her fingers, hoping the bush was still healthy. She wanted to be able to remember her dad through this rose bush.

But I came up with the idea, “Well, why don’t you get some cuttings and grow the rose bush yourself?”

Good idea? Totally. Preserving family memories? Big time. Ever wonder how you can preserve your very own favorite rose? Here’s a great method that I used to grow my grandpa’s roses from cuttings. And believe me, it works!

Click here to subscribe

What you need:

  • 2 large plastic containers (preferably a large, clear container for the top, I used a 2 liter soda bottle)
  • Potting Soil
  • Rooting Hormone (you can find it at Walmart, Home Depot, or Lowe’s)
  • Razor Blade
  • Hand Pruners
  • Rose Cuttings (see next section for instructions!)
2 liter plastic containers example

Instructions:

The rose cuttings should be 6-8″ long, trying to take a cutting from a stem that has a wilted rose on it already (this makes sure that the stem is in the growth mode and not the blooming mode). Try to make a cut close to the original stalk to get some of the growth collar on it. This is the brown ring around where the stem attaches to the original stalk. Your cuttings should look like this:

If transporting the cuttings, make sure that the cut ends do not dry out. This can be done by wrapping them in moist paper towels and then sealing the ends in a large plastic bag. I’ve also just put the longer cuttings in a vase full of water and they seemed to do just fine (though it’s harder to keep yourself dry on bumpy rides home!)

Instructions to grow perfect roses from cuttings

Planting your cuttings:

Now that you’ve got yourself a cutting (or two or three), take your plastic containers and cut off the top of the larger one, and the bottom of the smaller one. Then, cut drainage holes in the bottom of the plastic container. I usually just do a simple X in a couple of spots. Then fill the larger container with soil, leaving space in the middle to insert your cutting into. Next, take your cutting, and clip off the top that contains the wilted rose. Also cut off several of the leaves, leaving only two sets of mature leaves. Then, with the razor blade, carefully cut strips into the bottom of the cutting. These strips should be about 1/2″ long and should only cut through the soft, green layer of the stem. Be careful to not cut too deeply at this part.

planting your cuttings to grow perfect roses from cuttings
stem example to grow perfect roses from cuttings

Once it’s cut, dip the end of the cutting in water (making sure to cover the whole length of the slit area), and then dip it into rooting hormone. Lightly shake off any extra powder. Then put it into your already prepped container. Make sure that you press the soil around the end of the cutting instead of pushing the end down into the soil. This will help keep the rooting hormone on the cutting and not just loose in your soil. Press the soil down firmly to hold cutting in place and to ensure good contact. Then place second plastic container over the entire cutting.

Final Product to grow perfect roses from cuttings

Keep the soil moist, but not soggy. Transplant once there are two sets of new leaves and when outside conditions are fair. Enjoy your new roses! And, if you want to learn another way to grow roses, check out my post How to Grow Roses from Cut Flowers!

Happy Digging!

*This photo is taken several weeks later. The new leaves show that this little guy is ready to be planted!*

Click here to subscribe